
How to Create and Publish Terms Manually in the User Interface
Updated: July 2021
Description: Terms in AEFIS are a reflection of your Academic Semesters, Quarters or Terms. They are what guides your Course Section, Registration, and Student Degree file into the correct academic year and semester/quarter/term. They are built directly in the User Interface in the Term Manager. It sets milestone dates for the release of AEFIS Assignments, Course Evaluations, and Surveys, and sets the last day of Program Assessment for the previous term. Terms are required for the import of your data from the Student Information System on your campus!
Applicable to: Institutional Admin
Quick Video…
Note: This video does not contain audio
Step-by-Step…
Step 1: Log into your AEFIS account
Step 2: Select the three white horizontal lines in the top left hand corner to open the AEFIS Main Menu
Step 3: Navigate to Admin Tools > Terms
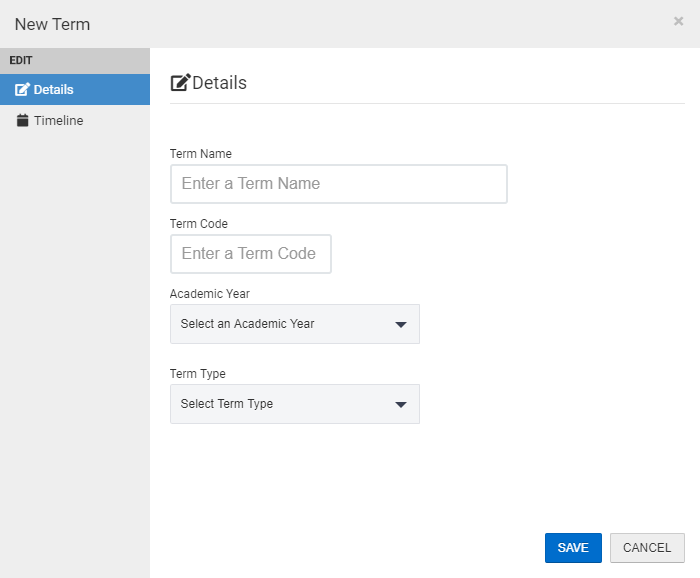
Step 4: Select the blue + ADD A TERM button in the upper right hand corner
Step 5: Populate the Details fields as indicated
Important Note: Term Code must match the Term Code that is being sent in the data feed for this particular term.
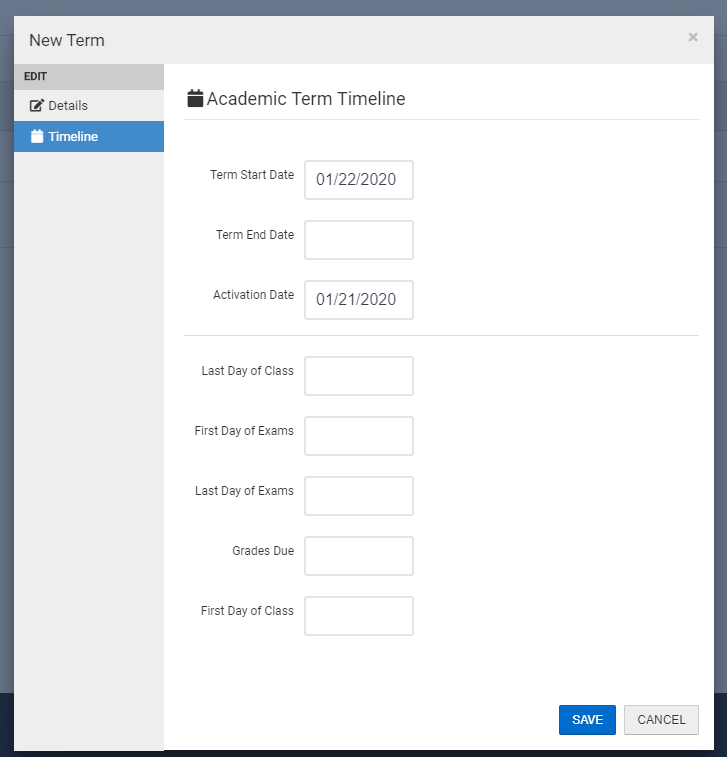
Step 6: Select the Timeline tab in the panel on the left hand side
Step 7: Populate the Timeline fields as indicated
Functionalities
- Term Start Date:
- This is an AEFIS date, as it will make the term-based Course Section and Registration information available in the user interface
- This does NOT have to match your first day of class
- This date can not be set in the past
- The first day to collect assessment data and start assignments
- The first day that evaluation instances can be created for beginning of term evaluations
- The first day that data collections can be started and corresponding email notifications are created and/or sent out
- Term End Date:
- This is an AEFIS date, as it indicates that the term is closed in AEFIS
- This will be the last day Course Sections and Co-curricular sections may be revised
- This is the last day a Program Assessment may be generated for the first time for a program
- Activation Date:
- Turns the term status in AEFIS from Pending to Active
- Should correspond with your institution’s LMS course import date
- The first day that a new assessment instance is generated, if assessments are enabled at the program level and/or course level.
- This date triggers any copying of course section data across terms (like assignments, assignment linking, course schedules, etc)
- This date may not be set in the past
- Last of Day of Class:
- Milestone Event in relation to launching surveys and data collection notification cycles for end of term
- Date that corresponds with your institution’s academic calendar last day of class
- First Day of Class:
- The Actual first day of your term
- The last day to collect data for the previous term’s program assessment instance (assessment end date)
- First Day of Exams:
- Milestone Event in relation to launching surveys and data collection notification cycles for end of term
- Date that corresponds with your institution’s academic calendar
- Last Day of Exams:
- Milestone Event in relation to launching surveys
- Date that corresponds with your institution’s academic calendar
- Grade Due Date:
- Milestone Event in relation to available survey results for instructors to access
Important Note: The Activation Date is the date that the term becomes active within AEFIS, which will display the data imported to all users and allow them to start working on items for that term. Typically, the activation date is set 4-6 weeks before the next semester begins.
Step 8: Select the blue SAVE button
Step 9: In the corresponding row of the newly created term, please select the Edit button
Step 10: From here you are able to:
- Edit Details and Timeline – save by selecting the blue Save button in the bottom right corner
- Delete the Term – by selecting the red Deleted button in the bottom left corner
- Publish the Term – by selecting the orange Publish button in the bottom right corner
Important Note: Once you have published the term, you CANNOT un-publish. If you are unsure of the dates you have entered, please select the Save button and Publish right before the activation date.
Helpful Tips
Please check and ensure that your term dates are correct before publishing! In any case that your term dates need to be amended after the term has been published, please reach out to the AEFIS Client Success Team for further assistance.


