
Adding and Mapping Student Outcome Learning Indicators/Performance Indicators in a Program – New!
Updated: June 2021
Description: AEFIS Program Curriculum Maps support multiple layers of outcome relationships. In most cases, Program Learning Outcomes (PLOs), Institution Outcomes (ILOs), or Accreditor Outcomes in AEFIS are mapped directly to Courses or Course Learning Outcomes (CLOs). However, there are some cases where an additional layer of indicators of outcome/learning achievement are needed to report on the breakdown of skills required to fully achieve that outcome. Some Accreditors refer to these as Performance Indicators In AEFIS, these are called Performance Indicators. This guide will demonstrate how to add Indicators to the Outcome Set of your choice (Program, Institution, Accreditor, etc).
Important Note: Once the Student Learning Outcome Indicator setting is turned on it must be used for every mapping to Course/Course Learning Outcome relationship. If there are some Outcomes that do not have multiple Indicators, you may create a one-to-one relationship between that Outcome and a single Indicator.
Applicable to: Institutional Admin, College Admin, Department Admin, and Program Coordinator
Part One: Enable the Student Outcome Learning Indicator Setting on your Program
Step 1: Log into AEFIS Account
Step 2: Select the three white horizontal lines in the top left-hand corner to open the AEFIS Main Menu
Step 3: Navigate to Programs>Programs
Step 4: Use either the +Add Filter or the search bar to locate the desired Program
Step 5: Select Manage for the corresponding Program
Step 6: Select the blue Revise button in the right-hand corner, if the program is not already in Draft or In-Revision status
Step 7: Navigate to the Settings menu on your Program
Step 8: Under Outcome Mapping and Measurement, toggle on “This program uses Student Outcome Learning Indicators” and click the Save Settings button directly below

Note: If any mapping was completed prior to updating this setting, the mapping relationships will be removed from your Program once you hit save. A warning will pop up to inform you of this.
Part Two: Add Student Outcome Learning Indicators to your Outcome Set
Step 1: Select Student Learning Outcomes in the panel on the left-hand side of your Program
Step 2: Select the blue Edit button in the right-hand corner
Step 3: Select the Outcome Set you would like to use to relate directly to the Course and/or Course Learning Outcomes you would like to add indicators to by using the grey Outcome Sets drop-down menu at the top of the Outcome Editor screen. You will only add indicators to the Outcome Set that is being mapped to the Course/Course Learning Outcomes.

Step 4: Navigate to the first Outcome you would like to add Performance Indicators to from the list of Outcomes.
Step 5: Next hover over its corresponding blue icon (with three white vertical dots) to the left of that Outcome

Step 6: Select the Edit Performance Indicators icon 
Step 6: Select the + ADD button in the top right-hand corner. Continue to add as many performance indicators as desired by selecting this + ADD button. An indicator code will automatically generate. You may change the indicator code, add the indicator descriptions, and add descriptions to the achievement levels if desired:

Step 7: (Optional)To add another indicator to that outcome, click the large grey +Add button at the top right of the indicator manager screen:

Step 8: (Optional) If you need to remove an indicator, you may click the small grey trash can next to the Save button.
Step 9: Once you have added the desired performance indicators, select the arrow in the left-hand corner next to Performance Indicators to close the indicator manager menu
Step 10: Once you have added the desired outcomes and linked the desired performance indicators, select the blue Exit button in the top right-hand corner to return to the
Part Three: Curriculum Mapping Indicators to Courses or Course Learning Outcomes
Step 1: Navigate to the Mapping by Course section of your Program
Step 2: Click the blue Edit button at the top right of that screen
Step 3: Select the Outcome Set you added Indicators to from the grey Outcome Sets drop-down menu on the left
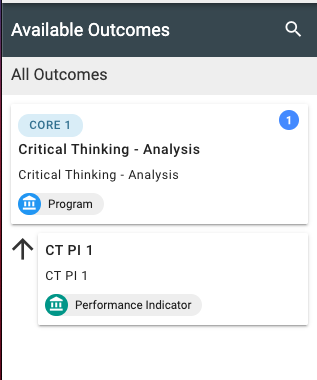
Step 4: You will then see the Outcome and related Indicators display on the left hand side of the screen in the Available Outcomes menu:
Step 4: Click on the Indicator you would like to map to a Course or Course Learning outcome and drag it next to the Course or Course Learning Outcome
Step 5: You will then see the Outcome/Indicator code relationship display in the mapping on that screen:

Step 5: (Optional) If you would like to adjust any mapping settings, just click on the Outcome Code bubble, and the mapping relationship menu will open on the right where you may change the Performance goal, Developmental level, Random Sampling settings (if enabled), and syllabus and assessment settings, and then click Save & Close:

Step 6: When mapping relationships and settings are complete, you may click Exit at the top of the Mapping by Course editor screen
Part Four: Creating Relationships between Outcome Sets that have Indicators Applied
Note: This is an optional process if you would like data to roll up from Indicator>Outcome to a higher level Outcome Set such as Indicator>Program>Accreditor or Indicator>Program>Institution. This must occur AFTER indicators are added to the Outcome Set that will be mapped to your Courses/Course Learning Outcomes.
Step 1: Navigate to the Student Outcomes page in your Program
Step 2: Click the blue Edit Button
Step 3: From the grey Outcome Set drop-down menu, select the Outcome Set to roll data up to that you did not add Indicators to
Step 4: Click the Blue circle with three dots next to the Outcome you would like to relate to the Indicator(s) you created to unfold the menu
Step 5: Click the Relate Outcomes icon 
Step 6: The Related Outcomes manager will unfold on the right side of the page. Click +Add Outcome Relationship
Step 7: This will cause a relationship manager wizard to appear in the middle of the screen. Select the Outcome Set you already added Indicators to from the drop-down menu and click the blue Next button
Step 8: Choose the Outcome you would like to relate and click the blue Next button
Step 9: Next check the box(es) next to the Indicator(s) you would like to relate to that Outcome and click the blue Next button
Step 10: Then click “Ok, Create Outcome Relationships”
Step 11: The relationship manager wizard will close, and you will see that the Indicator(s) you related are now displaying below the Outcome you selected in this Outcome Set, along with the code for the Outcome that Indicator was created for

Step 12: (Optional) To remove the relationship between the Indicator and Outcome Set, you may navigate back to the Related Outcomes right menu and check the box next to the Indicator Code and click the blue Remove button


Adding and Mapping Student Outcome Learning Indicators/Performance Indicators in a Program – New! Discussion